
Blueprint – 04. Purchasing / Procurement
General Glossary
| No. | Term | Explanation |
| 1 | MRF | Material Request Form |
| 2 | SIR | Site Item Request |
| 3 | RFQ | Request For Quotation |
| 4 | BOQ | Bill Of Quantities |
| 5 | QNT | Quantity |
| 7 | WBS | Work Breakdown Structure |
1 MRF Creation
In ProjectVIEW MRF is the step before Requisition’s Creation and in this way we successfully achieve to associate the Requisition Process with the Budget.
The appropriate columns that need to be filled are the following:
- T-Date
- Company
- Branch
- Budget Code
- BOQ Item/Package/Division
MRF is created either though SIR (in this screen the Site can request the materials they need-Inventory Module-),where the User is able to convert the SIR (Site item Request) to an MRF or through MRF Screen (MFR is not mandatory for Procurement Process).
In the MRF(Material Request Form) user can fetch data directly from the BOQ. They can apply different filters in order to obtain the correct data needed for the order. The filters include Packages, Cost Codes, Templates, BOQ lines, item groups, and item codes. Once the desired filters have been set, the data can then be fetched into the MRF.
Each MRF can be done for materials or for selected lines of MRF. A special flag indicates what type of MRF will be created.
- Materials MRF
If MRF is for materials, system groups same materials and presents them in one line.
The analysis of the BOQ lines for this material can be displayed by clicking a button. Then User can select the QNTs of the MRF.
It has to be noted that the QNT (already ordered/consumed/in stock)is also available in the system.
- Services MRF
The system allows a part of BOQ “as it is” to be copied and sent to subcontractors. When selecting this option user can activate any of the above filters and select the BOQ Lines that need to be sent to the Supplier. Moreover, if the contract requires specific items, the system can provide them by using the detailed items from the Subcontractor column from the BOQ.
In both cases, user can continuously append different filtered items in the same MRF. So user can modify the filters accordingly and continue selecting different items from different groups or packages.
2 Creating Requisition (From MRF)
Once the items have been selected and the correct quantities have been assigned to each line item, users are then able to transform the document from an MRF to a Requisition. This is easily done by clicking on “Create Requisition”.

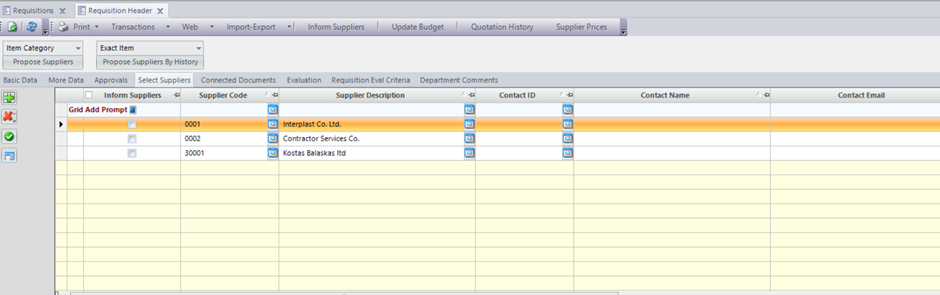
3 Selecting Suppliers – Creating RFQ
Users can select suppliers from the list of suppliers in the requisition screen.
This can all be done from the “select suppliers” tab. Then once the suppliers are selected RFQ can be created. For the RFQ to be created Users have to navigate to the “Transactions” drop-down list at the top of the Requisition header and click on “Create Quotations”.
4 Sending emails to Suppliers with RFQ and excel
(in case of many items)
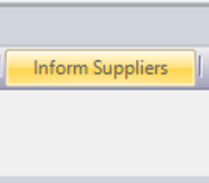
For emails to be sent to suppliers, their contact emails have to be already set up correctly in the supplier’s record in ProjectVIEW. By navigating to the “Send Quotation” button at the top of the Requisition header, a pop-up message(needing confirmation) will appear asking User if they would like to include the Excel. On this Excel Users can also add their payment terms, payment ways and delivery dates.
5 Import Excels from Suppliers
Once the suppliers have put their prices on the previously sent excel from ProjectVIEW, Users are able to upload it in the system. This is done by navigating to “Import-Export” at the top of the Requisition Header screen and then by clicking “Import Excel” . The excel file can now be selected and imported into ProjectView.

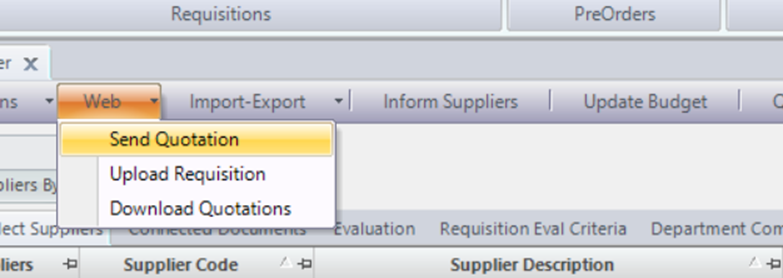
6 Upload RFQ to the portal and invite Suppliers to quote
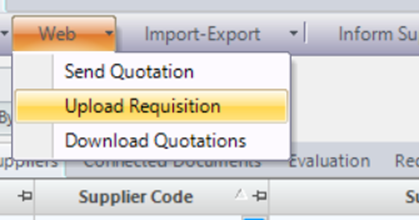
To use the web feature of ProjectView, navigate to the “Web” button on the top of the Requisition Header then select Upload Requisitions and upload quotations.
The first time this is done, the suppliers will receive an email with a link to the Supplier’s portal along with their credentials (username, and password). Once they are logged in, they are able to add prices into the requested items, attach documents, add payment ways, payment terms and delivery dates all on the web portal.
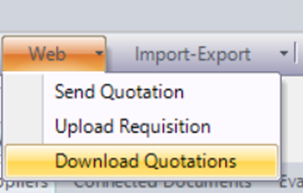
7 Download Suppliers answers and related documents
Once the suppliers have given their final prices on the web portal and attached the relevant documents. Only when the suppliers submit their final quotation from web portal(by pressing “Submit Quotation” ProjecVIEW users are receiving an email notification that the supplier has submitted their quotation by using the Web portal. Users are now able to download the quotations into ProjectVIEW. This can be done by navigating in the “Web” again and by selecting “Download Quotations”.
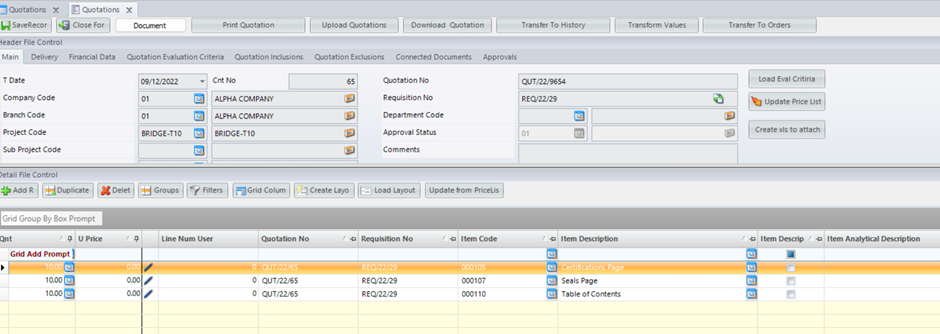
8 Update Quotation Manually (from Suppliers Answers)
To update the quotations manually, Users simply need to navigate to the “Quotations” section of the Purchasing/Procurement module then select the quotations that are relevant to the desired Requisition and edit the line items’ prices and all the requested details manually. Finally, the quotations need to be saved (“SaveRecord”).
9 Create Comparison List
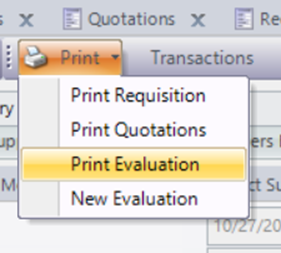
Once the final prices for all the quotations have been imported into ProjectView, Users are now able to create a comparison sheet/list among the suppliers’ quotes. This is done by navigating to “Print” at the top of the Requisition Header and then by selecting “Print Evaluation”. This allows Users to see the different prices per item given by the suppliers and allows them to decide better which supplier is the best for them. In the evaluation list Users are enabled to see delivery dates, delivery ways and payment terms which helps them to make a better decision.
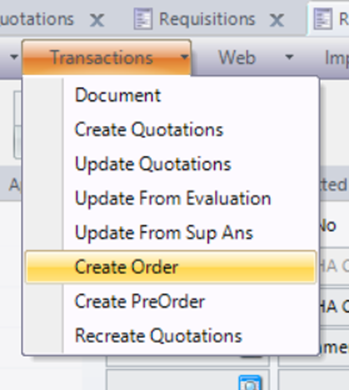
10 Create Orders
Once the prices have been finalized and the Requisition has been fully approved and put into the requisition, Users are now able to create an order/PO from it. Users simply need to navigate to “transactions” and select “Create Order”.
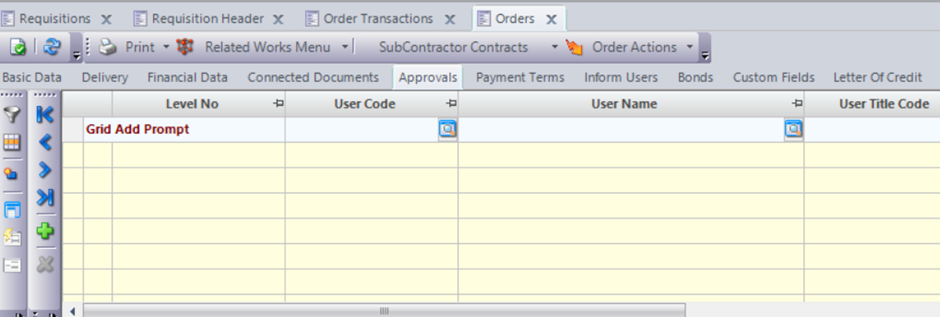
11 Approve Orders
To approve the order, an approval matrix has to be setup with price ranges, user roles, levels, and departments. Several approval matrixes can be created for the same screen. The users are notified by an email notification that an approval is pending for them once their approval is needed for the process to be continued. Only when the matrix has been fully approved the order can be sent out as a PO to the suppliers.
12 Create SubContractors Contracts from Orders
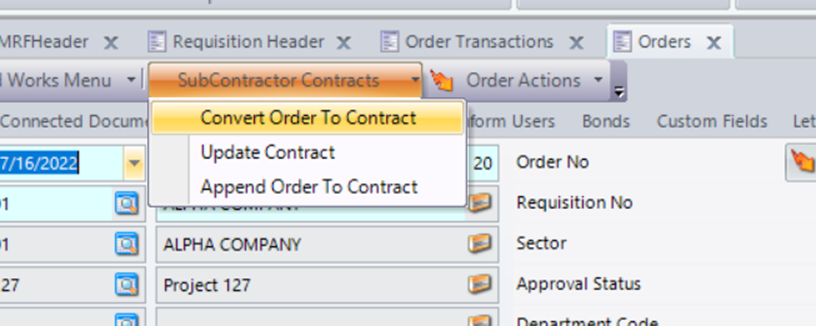
To create a subcontractor Contract from requisitions, the supplier selected for the job has to be categorised as either a subcontractor or both as a subcontractor and a supplier on his supplier information. Then same process has to be done as the one followed for a normal requisition up to the order. On the order Header Users are then able to transform the order into a subcontractor contract by navigating to the top of the Order Header “Subcontractor Contracts” and by selecting “Convert Order to Contract”.
Key Features and Functionalities Presented
| No. | Features and Functionalities | Yes/No |
| 1 | MRF Creation from H.O | |
| 2 | MRF Creation (via Site Item Request) | |
| 3 | Create Requisition (From MRF) | |
| 4 | Select Suppliers – Create RFQ | |
| 5 | Send e-mails to Suppliers with RFQ and excel (If many items) | |
| 6 | Import excels from Suppliers | |
| 7 | Upload RFQ to the portal and invite suppliers to Quote | |
| 8 | Download Suppliers answers and related documents | |
| 9 | Update Quotation Manually (from Suppliers Answers) | |
| 10 | Create Comparison List | |
| 11 | Create Evaluation Senarios | |
| 12 | Select Suppliers | |
| 13 | Select Combination of Suppliers | |
| 14 | Create Orders | |
| 15 | Approve Orders | |
| 16 | Create SubContractors Contracts from Orders |


0 Comments